Pyrography Wood Burning Tip Chart- an Amazing Read
Pyrography wood burning tip chart – this a wrong phrasing of the words in fact. We have mentioned the wrong phrase in the title since many people don’t know that, conventionally, the term pyrography is used alternately for wood burning. The most common form of pyrography uses wood as a medium and is aptly called wood burning. With how widespread wood burning is, beginners tend to be curious about the required tools. Especially, I’ve noticed people trying to find a good wood burning tip chart.
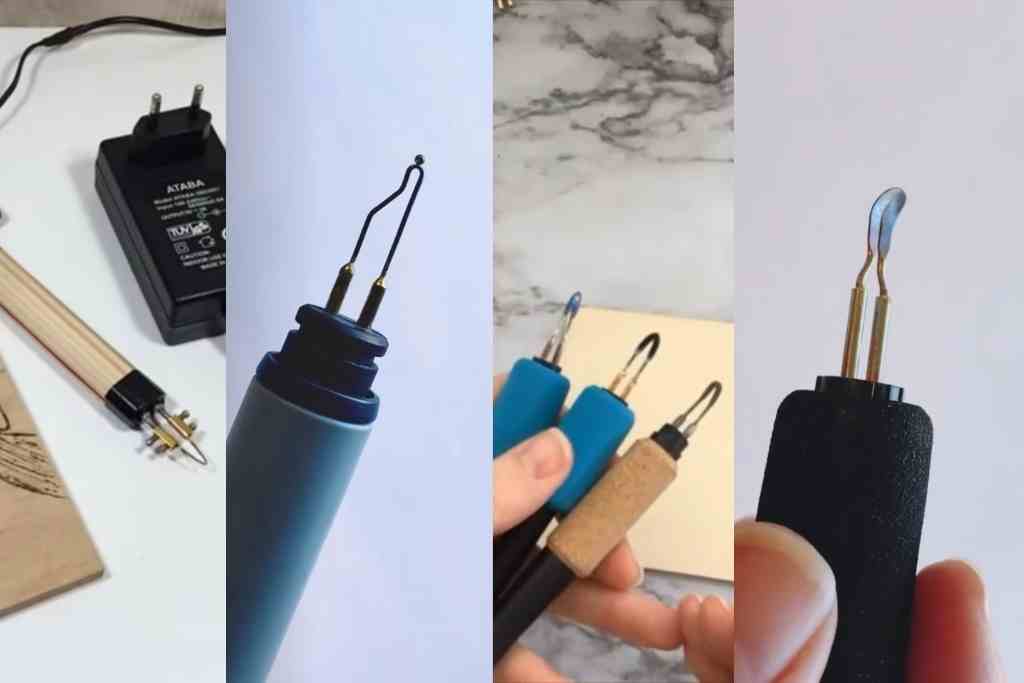
Burning a design onto wood requires a burner that you can essentially write with, i.e., a pyrography pen. The front end of the burner can be equipped with different types of tips for burning a variety of designs. Nibs are perhaps the most significant part of your tool.
In today’s blog, we have tried to hand you a chart, so you know more about the available wood burning tips– all in one place
Pyrography Tip Chart
You can use two types of pen tips for wood burning: solid-point and wire-nibs. Both of the types are self-sufficient and can pretty much burn on anything you want. The choice will mostly depend on your preference and comfort. Take a look!
| Attributes | Solid-point | Wire-nib |
| Description | Solid brass tips screwed into a long-heated shaft, like soldering irons | Nichrome wires bent in different shapes |
| Mechanism | The pen produces heat inside and gradually heats up the tip through the shaft | Electricity passes through the wire and produces heat |
| Common Types and Uses | Universal point: Meant for using anywhere Calligraphy point: Straight lines, shading Flow point: curved lines, large area fills, block lettering Cone point: curved lines, curved lettering, detailing Shading point: All kinds of lines, lettering, shading | Skew tip: Thin straight lines Spear tip: Detailing Writing point tip: curved lines, lettering Flat shader: Shading Ballpoint tip: Lettering |
| Less Common Types and Uses | Tapered point: thin lines and lettering, dots Transfer point: transferring printed images to wood Hot stamp points: decorative designs, custom stamps | Needlepoint nib: Detailing Flat shaders with a sharp edge: thin straight lines Spoon shader: Shading Groove tips Chisel shaders |
| Attachment Types | -Fixed tip -Interchangeable tip | -Fixed tip -Interchangeable tip |
| Burner Price | $15-$30 | $100+ |
| Pros | -Budget-friendly -Retains heat longer -Large selection of stamps and pattern tips -Consistent heat -Grip doesn’t commonly get hot due to ventilation holes -Anti-slip handle -Preferred by beginners | -Heats up and cools down fast -Thin handle -Precise temperature control -Easy to customize -Unlimited option for nib shapes -Short distance between the hold and the surface, like a pen -Doesn’t break easily -Preferred by professionals |
| Cons | -Long heating and cooldown period -Thick handle -Limited nib shapes -Fixed power settings -Hand stays away from the surface due to the shaft -Heating can loosen the tip from the pen -Heated brass can bend under pressure and deform the tip | -Expensive -Burner can make short circuit -Burner can get too hot, making it troublesome to grip, if the heat is left unused for long while being connected to the power circuit -Heavy extra power supply -Need to control the voltage carefully to get the desired temperature |
Here’s a helpful video to help you understand wood burning tips better: https://youtu.be/yRblAn_moP8, you can play the video directly as well here.
Useful Tips and Tricks for Wood Burning Tips
- Try to recognize your wood surface and how fast it burns. You can adjust the pressure and temperature of your tool accordingly.
- Bigger solid nibs and wire nibs with smaller gauge numbers take longer to heat up.
- Learn to identify nib shapes and which ones are best for which designs. It will help you to efficiently use them for your project.
- The sharper the nib is, the more it digs into the wood. Round nibs don’t sink in as much, so they are better for curving and quick direction changes.
- It is unnecessary to press down too hard with your burner. Generally, you’ll find that either your nib is not yet hot enough, or you just need to work a little slower.
- You’ll have an easier time if you burn along the grain. Going against it will be troublesome.
Pyrography tips are always a technical and an interesting topic at the same time.
FAQs
What do the different pyrography tips do?
Different pyrography tips can produce burning marks of varying shapes and sizes and they are designed for different functions and hand movements.
Wrapping It Up!
You’ll need to think about what kind of project you’re working on to correctly choose a tip style. Our wood burning tip chart can at least steer you in the right direction. Try to know your tools, and don’t be discouraged if it doesn’t work out. It will be a learning experience for your success. Enjoy and happy burning!
