What Is Pyrography Gel And How To Use It in 7 Steps? – A Superb Alternative
But how much do we know about pyrography gel and how to use it? I knew nothing about this till last week. I was quite familiar with burning pen pyrography, branding iron pyrography, and high-voltage pyrography. But my mind blew completely when I came to know that you can create the base for wood burning designs using gel paste.
The pyrography gel is a paste-like substance made using various ingredients, such as ammonium chloride, Thick-it, warm water, various food colors, etc. Placing stencils on wood, you have to apply the gel over the stencils to fill the designed areas. Then use a heat gun to burn the design.
Yes, the heat gun pyrography with gel is as simple as that. But I have discussed them in detail in this article for your convenience.
How To Make Pyrography Gel?
Pyrography gel is easily available in physical and online stores for purchase. But if you are an all-DIY person and want to skip purchasing it, you can still make the gel yourself. Besides, learning how to make the gel comes in handy in case you cannot find it for purchase.
Pyrography Gel Making Supplies You Will Need
- Ammonium chloride – 1tbs
- Thick-It – 8tbs
- Warm water – ½ cup
- Popsicle
- Food color – 2-3 drops (optional)
The Process
- Take ½ of the warm water in a jar or small container.
- Then add ammonium chloride and Thick-it to it.
- If you want the gel to be easy to detect on a surface, you can add a few drops of food color, such as red, orange, blue, etc.
- Mix everything together using a popsicle. And the mixture will appear thick, like gel.
How To Use Gel For Wood Burning?
In the following part, I will provide a step-by-step guide on how to do pyrography using gel and heat.
Things You Will Need
- Wood piece
- Stencils
- Scissors
- Masking tape
- Pyrography gel
- Gel applicator
- A heat gun
- A clean fabric
- Stain or sealant
Step 1: Gather The Supplies
Before you start the gel application and burning processes, make sure you have all the essential supplies. Since I have mentioned what you will need, you can check if you have them all. Once you are confirmed that you have everything required, move to the next step.
Step 2: Prepare The Wood
The wood you use for pyrography should be well-dried in the sun for a few days before burning. It lowers the possibility of damage or cracks in the future. And if it has raised gains, you can use 220-grit sandpaper to smoothen the surface. But make sure to wipe everything off the surface before moving to the next step.
Step 3: Attach Stencils
Take the stencil and place it over the wooden piece. You can print out your stencils with your preferred design if you have the necessary equipment. But if you don’t, you can purchase them from online or offline stores.
If the stencil seems larger compared to the wood piece or if you want a smaller design, cut the stencil with a pair of scissors. Then use masking tape to secure the stencil so that it wouldn’t move. You can use a squeegee to flatten the stencil over the wood to ensure there is no air bubble underneath.
Step 4: Apply Gel And Let It Dry
Once the stencil is well-secured, take your gel container to apply some. You can either use a brush or soft fabric for that. You can also take some gel on a small applicator squeegee. Apply the gel horizontally or vertically to ensure you have covered all the open areas.
Then let the gel dry for a few minutes. But no, you don’t have to remove the stencil as it dries. And once the gel is dried completely, you will find the areas appear hard and rough as you run your fingers over them.
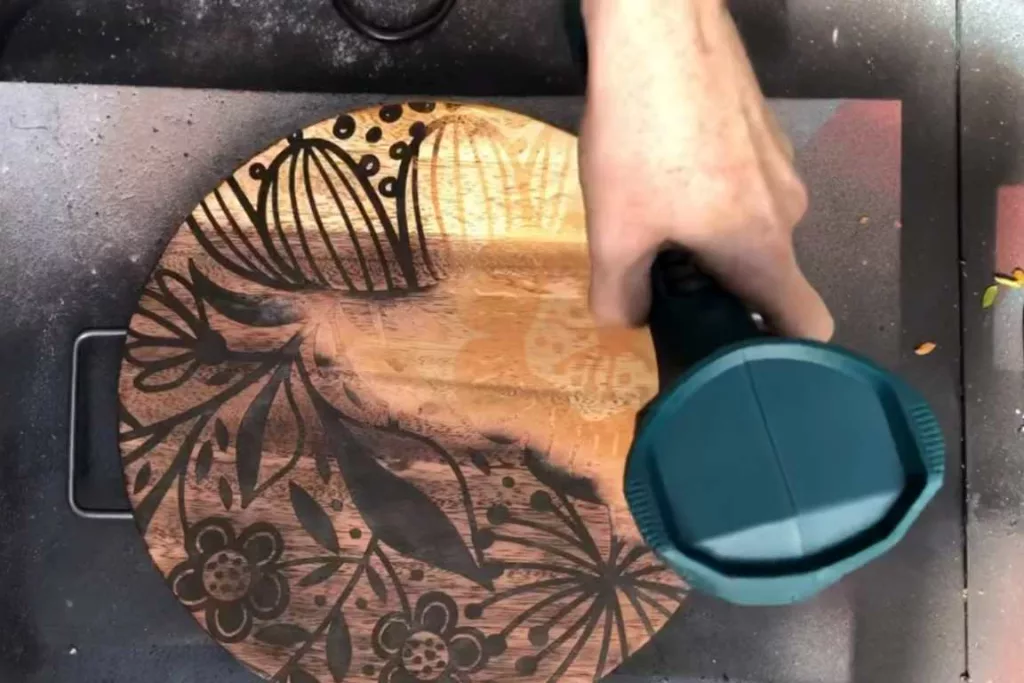
Step 5: Apply Heat With A Heat Gun
After the gel has dried, slowly take off the stencil. Then plug in your heat gun and turn it on. And then, apply heat over the areas where you applied gel by holding the gun head straight over it.
But keep the heat gun moving all around the gel without holding it in one place for long because that might burn the wood more than you intend to. As you gradually apply heat over the gel areas, you will notice that the heat is burning the wood surface and darkening the patterns or designs.
Step 6: Clean The Surface
After the burning process is done, you will still find the gel sticking to the wood surface, and it will look a bit messy. Though some people recommend washing the wooden piece, I will say it is best if you just wipe it off with a clean and wet fabric. The gel should come off easily.
Step 7: Apply Stain/Finish
You can apply wood stain to get an overall darker shade. And if you want the design to be long-lasting and protect it from dust and damage, you can apply a good-quality sealant.
The video given here demonstrates application of pyrography gel perfectly.
In addition to this, here’s another video of the same kind, for your easy understanding.
Lastly, this article offers you some introductory woodburning design ideas for easy pyrography patterns that you can try while learning this new technique.
Safety Tips
Wood burning with gel and a heat gun is completely harmless. In fact, unlike the other methods, you can actually apply this technique without worrying too much about wearing safety equipment.
Nevertheless, you will still be dealing with heat, fumes, and possibly, dust. So here are some precautions you should maintain.
- Always use untreated wood for your wood burning projects. That means the wood should not contain any man-made substance or even stain or paint.
- Some people do apply a layer of stain before burning wood, but I suggest avoiding that as such wood also emits harmful smoke.
- Never use a heat gun for wood burning inside your home or in a smaller area. Since the heat gun produces fumes as it burns wood, your fire alarm may go off.
- The gel might not sit tight and prevent even burning if there are raised gains and the wood surface is uneven. So it is best if you sand it to prepare and then use a clean fabric to wipe the surface.
FAQs
What is wood burning gel?
A wood-burning gel is a viscous and semi transparent heat activated chemical substance which is applied on wood using a stencil. And the area where it was applied gets burnt when it is exposed to hot air.
What is wood burning gel made of?
Wood-burning gel is made of Ammonium Chloride, a thickening agent, and warm water.
What liquid is used for wood burning?
Ammonium chloride is the liquid that is usually used for it. If you want to thicken it, you can add corn starch and warm water.
How long does wood burning gel take to dry?
The duration of the gel drying varies from gel to gel as they might contain other ingredients. But in most cases, the gel takes 5 to 10 minutes to dry completely. In rare cases, it takes longer than that for the gel to dry.
Can you stain or seal the wood after the heat gun burns it?
Yes, definitely! Stains give the wood a darker shade and help highlight the wood burn designs. And you can also apply sealants to make the wood burning design or art more durable and prevent it from fading sooner.
Can I use a hair dryer instead of a heat gun?
You can use a hair dryer for gel pyrography. But unfortunately, a hair dryer cannot provide you with the high-temperature heat that you require for such pyrography and will not offer the best burning shades.
How do you make wood burning gel or pyrography paste at home?
To make woodburning gel at home, you have to first take a big bowl. Then combine 1 tablespoon ammonium chloride, 1/2 cup warm water, some food coloring, and 8 tablespoons of Thick-it. Then stir the combination and leave it for hours. Your gel will be ready for use soon.
What is Torch paste for wood burning?
It is also a heat activated chemical compound like woodburning gel, and burns the wood surface under hot air exposure. The name Torch Paste is a brand name. You can apply also on plywood, card board, fabric and bamboo.
Conclusion
Knowing about pyrography gel and how to use it is very useful if you don’t have a burner tool and prefer something simple. The ingredients for making gel are accessible. And the best part is you can store the leftover gel for your next projects.
More Articles
Here are some more tools and things that you need while doing the burn arts.